A Step by step guide to making a custom interactive map
- Nan Zhou
- Mar 7, 2024
- 2 min read

Updated: Apr 2, 2025
Do you need to build a custom interactive map like Airbnb's or Zillow's? With custom filters tailored to your business and dataset, and calls-to-action of your choosing and unique to your use case? Without coding? Well, we have the answer for you!

Creating professional quality interactive maps in 3 simple steps
Choose your map template
Connect your data
Customize your map
Once you are done, you can publish your map as a standalone map or embed it onto any website regardless of the platform.
Step 1: Pick a map template for your use-case

You can choose from our list of 6 ready-to-use map templates, all designed and built based on real-life leading industry designs:
1. General
2. Timeline
3. Event calendar
4. Restaurant
5. Product locator
6. Property
7. Zillow like real-estate template
Step 2: Connect your data
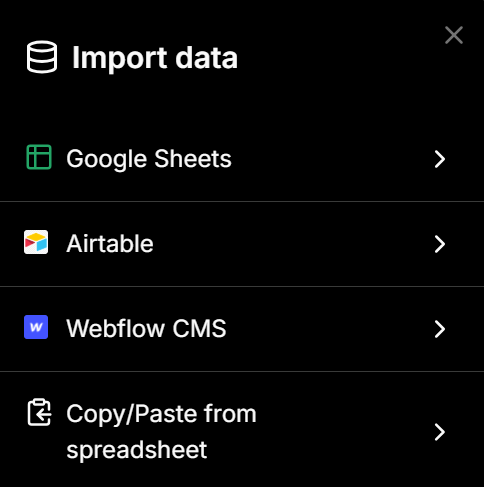
Once you have selected your template, all you need to do is import your data. No Code Map App is the only custom map builder that offers users multiple ways to import their data:
1. Copy and paste in your data from any spreadsheet, or
2. Link your Google Sheets / Airtable / Webflow CSM

You can also choose how you want to import your data then set up automatic data update so you don't need to manually update every time.
If you would like to use Google Sheets, all you need to do is copy and paste the URL, that's it!

We will detect all your data columns and you can choose which ones to import for your map.

Our map builder is so intelligent you can include any data field - detail fields, description, calls-to-action links, media (image and audio links) etc. The only required data columns/fields are "name" and "address".
"address" (or "location") column
"name" column
Click on "Map My Data", then, our map builder will automatically populate your map template with your data. Your map will also include auto-generated sidebar, map filters and calls-to-action based on your dataset.

Step 3: Customise your map

Once your map has been generated, you can customise it to your preferred marker, color, font, zoom level and search bar setting etc. Literally every part of your interactive map is customisable! You can also embed media to each location and import kml files.
Furthermore and also uniquely to us is that you can also customise your map filters and call-to-action buttons. No Code Map App is the only custom map maker that auto-generates customisable map filters and call-to-actions based on your dataset. Typically these are only seen on custom-built interactive maps. Now you can have them too without coding or hiring a developer.
With the right map filter and call-to-action buttons, you can link your interactive map with your other business tools (like Google Form, Stripe, PayPal, Calendly), and turn your interactive map into an "actionable" map where your site visitors could directly:
Buy or pay
Subscribe
Contact
Fill in a form
You can connect pretty much any internal or external site/tool to your custom call-to-action button and create an interactive map that is comparable to any custom-built map!

Give it a try and let us know what you think! :)
Nan


Comments