How to display real-time Airtable data on a map?
- Nan Zhou
- Sep 23, 2024
- 3 min read

Updated: Apr 4, 2025
Creating an interactive map for your website can significantly enhance user experience, boost engagement, and provide valuable information to your visitors. Whether you run a business that wants to showcase multiple locations, an organization promoting events, or a blog aiming to share geographical data, an interactive map can be a powerful tool in your digital arsenal.
In many cases, being able to update data in real-time can be crucial in engaging and converting your website visitors. With No Code Map App, you can now create a map showing real-time data without any coding.

In this guide, we'll take you through a simple 5 step process on how to make your own interactive map with real-time data update.
5 Simple steps to build a custom interactive map with real-time data update
Create an account on No Code Map App and open a new map
Choose an interactive map template
Connect your Airtable database to import your location data
Under "Set up auto data sync", select "Real-time data sync"
Customise your map
Step 1: Create an account and open a new map
Sign up an account on www.nocodemapapp.com. Then click on "+ New Map" button.
Step 2: Choose an interactive map template
We have pre-built 7 ready-to-use map templates for a variety of industries and use -cases. Simply choose one that suits your use-case, if not just opt for the "General" one.

Step 3: Connect your Airtable
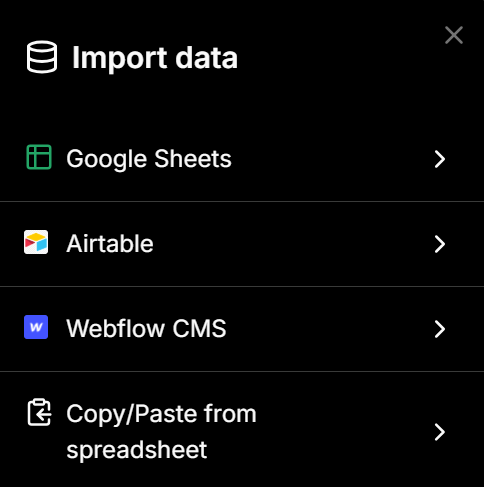
Now, it's time to map your locations and location details. To get your location database mapped, all you need to do is connect your Airtable database.
Under "Import data", click on "Airtable"
Enter your Airtable Access Token
Enter your Airtable URL
Under "Select data sync frequency", select "Real time"

Step 5: Go to Airtable and set up real time data sync

If you don't want real-time data sync, you can also choose to sync your data periodically. You can choose one of the 4 data sync frequency:
Daily
Weekly
Bi-weekly, and
Every 4 weeks
How to create your Airtable Access Token for Real-time Sync
Airtable has deprecated usage of API Keys since Feb 2024. New integrations shall use Personal Access Tokens going forward and it's 100% compatible with us.
You need to create a new Personal Access Token instead (above the "Developer Key" item in the menu) . The new token has a format of "patXXXXX" and is much longer than the old keys.
When it asks you to set permission scopes, can you set the scope to. Please make sure you configure to allow webhook.create permission.

Step 6: Customizing design and features
Once you have your database connected, you can personalize your map by tweaking the design elements to align with your website's branding.
No Code Mapp App offers users a suite of customisation options including colour, font, marker, custom map filters, pop-up box and more! Choose color palettes, fonts, and icon styles that resonate with your overall visual identity. Additionally, incorporate features like zooming, panning, and filtering options to give users control over their map exploration.
Also you can add clickables and custom calls-to-action to engage your audience and provide them with a seamless browsing experience. Here is a guide on 10 engaging calls-to-actions you can add to your map.

Our AI-powered customisation capability means you can customise with just clicks or simple text prompts.
Conclusion
In conclusion, creating an interactive map for your website can be a game-changer in enhancing user engagement and providing valuable information in a visually compelling way. By following the steps outlined in this guide, you can craft an interactive map that captivates your audience, drives traffic to your website, and sets you apart from the competition. The best of all, it is completely without any coding!
Nan


Comments